AR information design flow
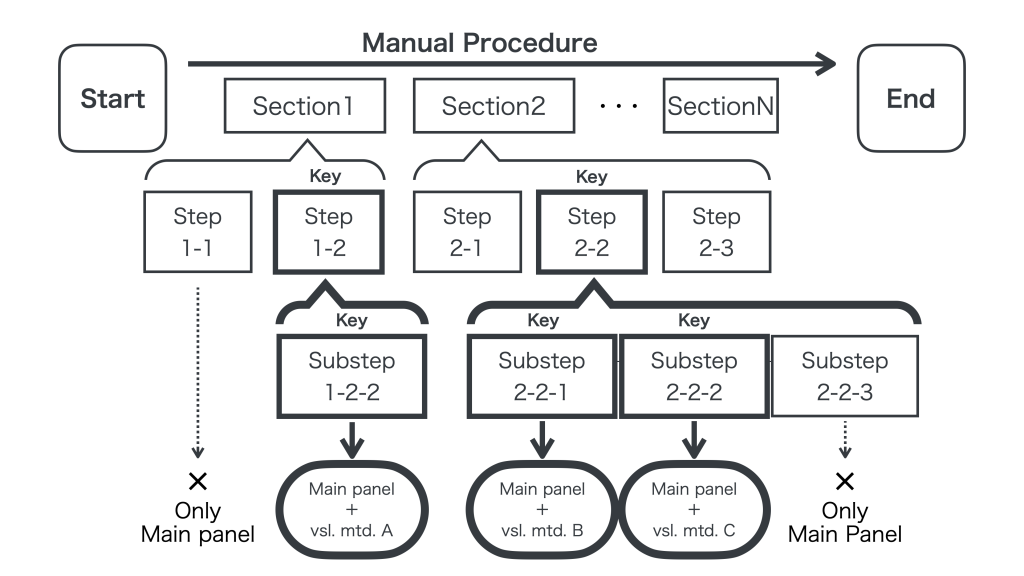
- Enter all sections that represent a series of operations in a manual procedure.
- Enter all steps that represent procedures in each section.
- Decide key steps that require AR assistance in all steps
- Decompose the selected key step into the required substeps.
- Decide key substeps that require AR assistance in all substeps
- Apply visualization methods as the auxiliary information only to the key substeps.
Notes:
Key substep: main panel and auxiliary information (visualization method).
Non-key substep: only main panel.

Start guide of
the AR information design page
(If you already have an XML file, please read “AR Information Design Using XML files”).
The following process shows how to create an XML file that summarizes the AR information design content.
- Enter the title name of the target task.
- Select the HMD used and enter images of AR markers used if you use it.
- Enter the name of the sections.
- Select one section to edit from the pull-down menu at the top of the AR information design table, and enter all information about the steps in that section.
- Select the key steps from the steps entered.
- For each key step, decompose it into one or more substeps based on the predefined substep type in the pull-down menu.
e.g.
Key step “Connect the two-floor flames with the brackets.” -> Substep type “Identify/Locate (the placement of the floor frames)” + Substep type “Identify/Locate (the placement of the brackets)” + “Install/Joint (the floor flames into the brackets)”
It can be decomposed into the three substeps above. - Select the key substeps from the substeps decomposed. (After clicking on the key substep, an information entry screen will appear on the right side of the page.)
e.g.
Select the third substep, “Install/Joint”. - On the right screen, select the main information type to show operators, tracking type, and working conditions.
[Main information type]
If you want to show the operator “the goal appearance of two objects (floor frames and brackets) after they are connected”, you will enter the appearance of the goal object (the Installed floor frames and brackets).
[Tracking technology]
If you want to use an AR marker to display 3DCG overlaid on the objects, you will select a pre-registered AR marker.
If you want to use other technologies to display 3DCG overlaid on the objects, you will select the appropriate tracking degrees of freedom (tracking-DoF) from the four types of tracking-DoF for the system to acquire the object.
[Working condition]
Assume the operator’s real work and check the working conditions that match. - Click the button, “Output suitable visualization methods”. Compare the output candidates and select one suitable visualization method.
- Perform processes 6-9 above for all key steps in the AR information design table, and then change to another section and repeat this for the other remaining sections.
- Finally, click the button at the bottom of the AR information design table, and download the design content as an XML file.
AR Information Design Using XML files
- Click the “Browse…” button at the top of the page and select the XML file you have.
- Click the Upload button to apply the content of the file into the page.
- Perform processes 4-11, edit or add working information to update the AR information design table, and then download it as an XML file.
Design table structure
On this site, an AR information design table is created for each section.

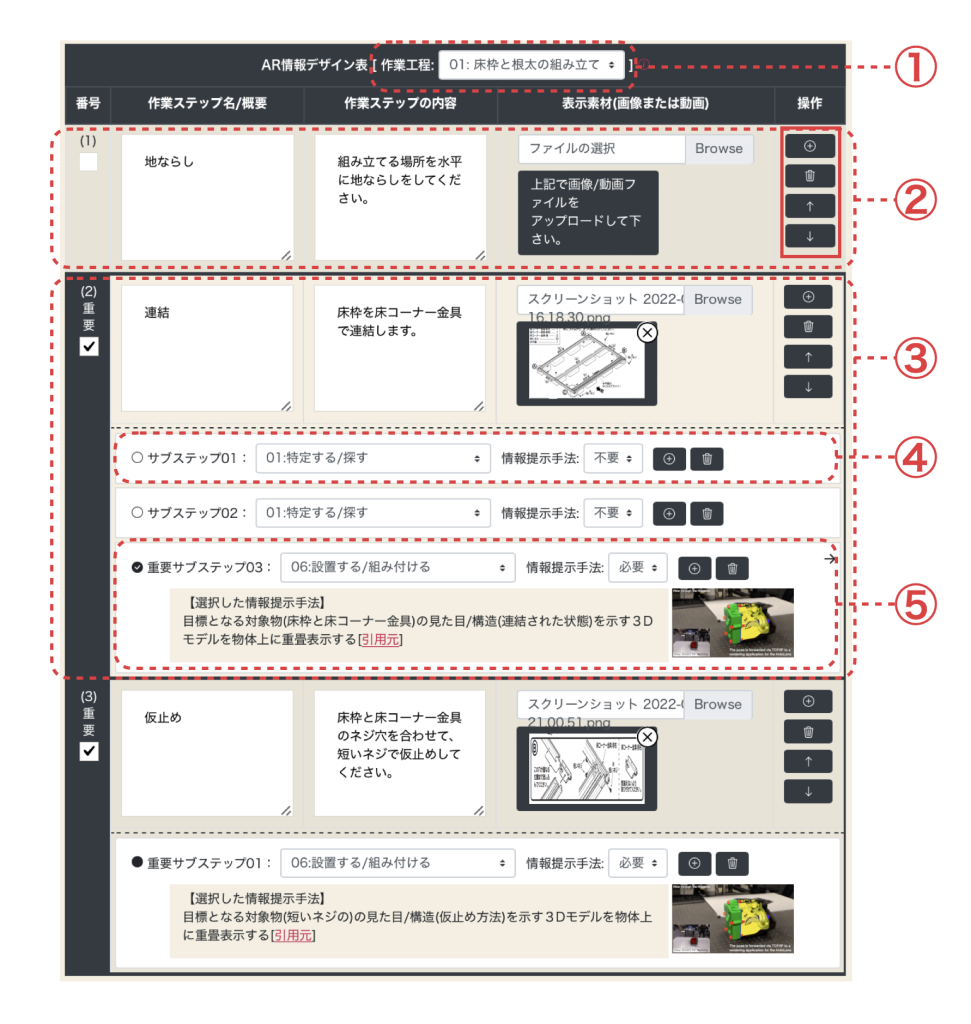
- Pulldown menu to select the section to edit.
- A step line that shows the information on the non-key step. You can enter the step name, content, image, and video to display in one main panel.
- A key step line that shows information displayed in the main panel and visualization methods selected as the auxiliary information.
- A substep line that shows the information on the non-key substep. There is a pull-down menu to select the substep type.
- A key substep line that shows the information on the key substep. There is a pull-down menu to select the substep type and the visualization method selected on the right screen.

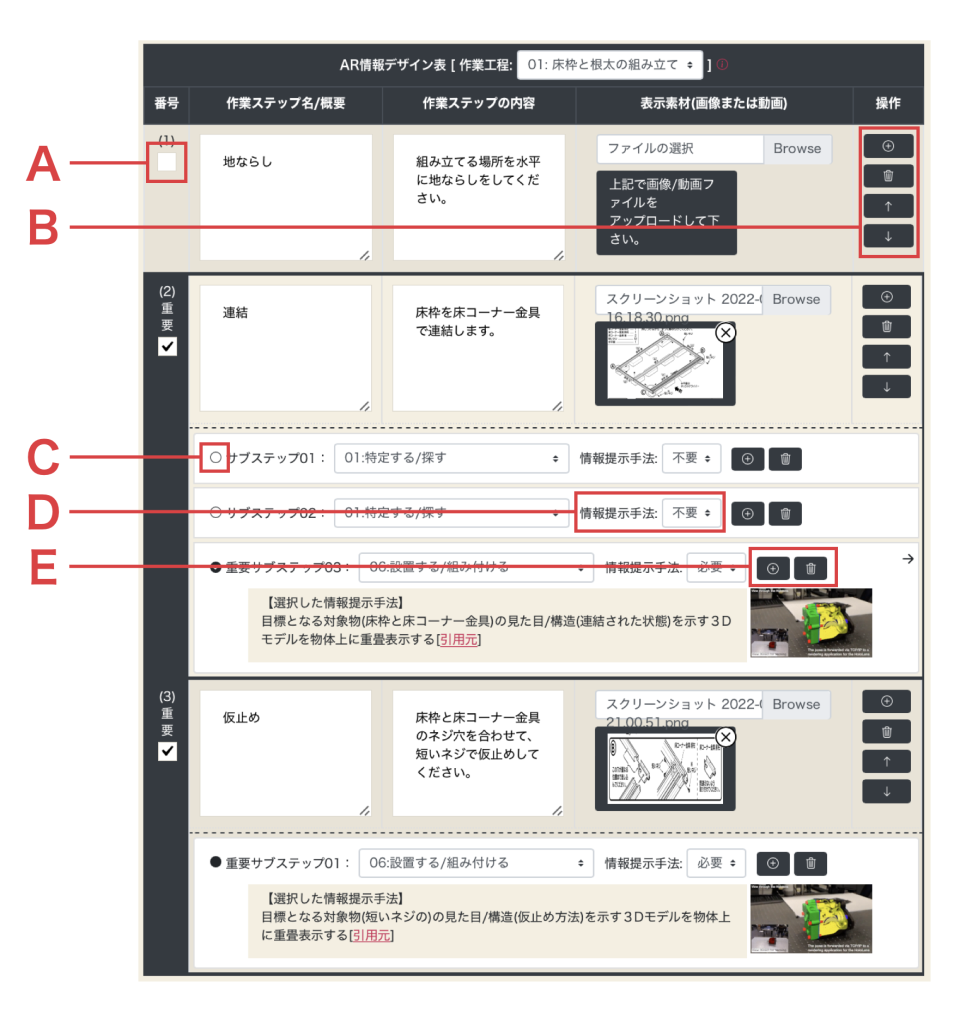
A: Checkbox to select a key step. The color of the line changes to black when the checkbox is checked.
B: Buttons for adding and deleting steps and replacing the previous and next lines.
C: Checkbox to select a key substep. The color of the white circle changes to black when the checkbox is checked.
D: Pulldown menu to select whether or not the subtask is key.
E: Buttons for adding and deleting substeps.